Seagate Backup Plus Slim Not Detected: Recovery Walkthrough
Our founder and lead technician, Joseph Montanti, handles cases personally.
If your Seagate Backup Plus or Backup Plus Slim isn't detected when you plug it in, the most likely cause isn't a dead drive. It's the USB-to-SATA bridge chip Seagate built into the PCB. That chip translates between USB and the drive inside. When it fails, the computer sees nothing, even though the platters are still spinning fine. The other common causes are a bad cable, a damaged USB port on the drive itself, or a real mechanical failure of the disk. Each one looks identical from the outside.
Don't run Disk Management's "Initialize Disk" prompt. Don't agree to format it. Don't keep plugging it in and out, hoping it'll catch. The Backup Plus line is one of the trickier external drives to recover because Seagate integrated the bridge chip directly onto the drive's own PCB. That makes the simple "transplant to a new enclosure" fix that works on most externals impossible here. There's a path forward, but it runs through a lab with the right tools.
On this page
What "Not Detected" Actually Means
When you plug in a healthy Backup Plus, three things happen almost instantly. The drive spins up. The bridge chip enumerates over USB. Your operating system mounts a drive letter (Windows) or a volume on the desktop (macOS). All three steps have to work. If any one of them fails, the drive looks dead.
"Not detected" can mean a few different things depending on how you check:
- Nothing happens at all when you plug it in. No spin-up, no light, no sound.
- The drive light comes on but the computer never sees it.
- You hear the drive spin but no drive letter or volume appears.
- Windows shows "Unknown USB Device" in Device Manager.
- Disk Management sees the drive but lists it as uninitialized or with a "0 bytes" capacity.
- macOS shows the drive in System Information over USB but Disk Utility shows it as uninitialized or unreadable.
Each one of these symptoms points to a different failure. The first two usually mean a power problem. The middle two usually mean a bridge or filesystem issue. The last two usually mean the drive itself is talking but the data layout has been corrupted or the platters can't be read cleanly.
Why Backup Plus Drives Fail
These symptoms can have several different causes.
1. USB Cable Failure (more common than people expect)
The micro-USB or USB-C cables that ship with these drives have a known weakness around the connector. The thin internal wires fatigue every time you wrap or unwrap the cable. Bend it the wrong way enough times, and one of the four conductors snaps inside the insulation. You can't see it. The drive just stops being detected one day. Always try a different known-good cable before anything else.
2. Bridge Chip Failure
The USB-to-SATA bridge translates USB commands into SATA commands the drive understands. On the Backup Plus and Backup Plus Slim, this bridge is a small ASIC soldered to the drive's own PCB (not a separate enclosure board). When the bridge dies from a power surge, heat, or just age, the drive becomes electrically invisible over USB. The drive itself is fine. The translator just stopped working.
3. Drive PCB Damage from Surge or Static
A small voltage spike (a laptop with a flaky charger, a static discharge from the user's hand) can fry the chip that handles power regulation on the PCB. Symptoms range from no spin-up at all to a brief spin-up followed by an immediate shutdown. Often you'll smell a faint burnt-electronics scent if you put your nose right against the drive shortly after the failure.
4. Mechanical Failure of the Platters
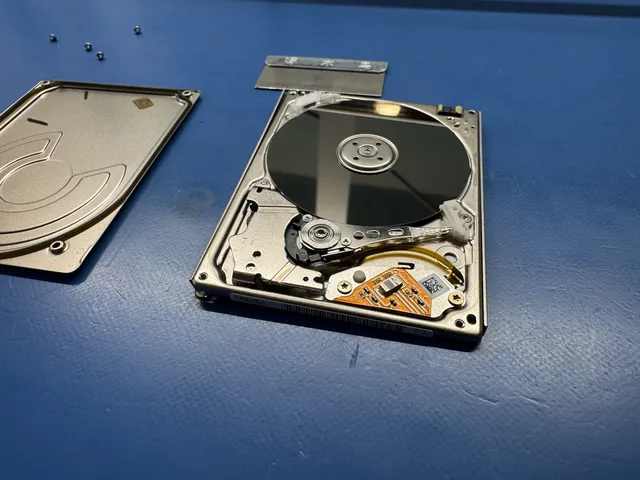
The actual hard drive inside the Backup Plus enclosure is a standard 2.5-inch laptop-class disk (for the Slim) or 3.5-inch desktop disk (for the Hub or larger Backup Plus models). It can fail the same way any drive fails. Stuck heads. A platter scratched by a head crash. A spindle motor bearing that won't reach full speed. Head and platter work requires a clean, filtered work area.
5. Firmware Corruption
Each Seagate drive has firmware code stored in a reserved area on the platters themselves. If a power loss happens at exactly the wrong moment during a write to this area, the firmware corrupts. The drive spins up but refuses to identify itself. It's recoverable in a lab using vendor tools but invisible to a regular computer.
6. Dropped Drive Damage
Backup Plus Slim drives are popular because they're small and travel-friendly. They're also small enough to slip out of a laptop bag onto a hard floor. The 2.5-inch drive inside has heads that can be knocked off track by a 3-foot drop. The drive may still spin but will click, beep, or read at 1 MB/s instead of 100. Dropped drives are their own recovery category and need fast intervention.
7. Heat from Continuous Use
Backup Plus enclosures have minimal ventilation. If you leave the drive running 24/7 as cheap RAID or constant backup, internal temperatures can climb past what the drive was rated for. Over months or years, this kills the bridge chip first, then the drive itself.
The Integrated Bridge Problem (Why You Can't Just Pop the Drive Out)
This is the part that catches people. With most external drives, if the enclosure dies you can just pop the drive out, plug it into a desktop computer via a SATA cable, and read it as an internal drive. With Seagate Backup Plus and Backup Plus Slim, that trick doesn't work cleanly.
Seagate built the USB-to-SATA bridge directly onto the drive's PCB instead of putting it on a separate enclosure board. The SATA pins you'd normally find on a hard drive are gone. In their place: a smaller, non-standard connector that wires directly to the bridge controller. When the bridge dies, you can't just attach SATA cables and read the drive. There's nowhere to plug them in.
The bridge isn't just a passthrough either. On many Backup Plus models, the bridge handles the USB protocol layer in a way that's deeply intertwined with the drive's firmware. Even if you could solder wires to the right test points, the data wouldn't be in a standard SATA format. It comes off the platters already wrapped in Seagate's USB-mass-storage envelope. A regular SATA controller wouldn't know what to do with it.
There are two ways out of this for a recovery lab:
- Solder to PCB test pads. Many Backup Plus PCBs have undocumented test points that expose raw SATA signals before they hit the bridge. With the right pinout (which has to be reverse-engineered or sourced from Seagate's vendor materials), a technician can solder fine wires to these pads and connect them to a SATA imaging tool.
- Head transplant to a donor drive. When the platters themselves are healthy but the PCB is unrecoverable, we can move the entire head stack and platters into an identical-model donor drive that has a known-good PCB. Head and platter work uses compatible donors in a laminar-flow work area.
Either path needs a lab. Neither is a DIY operation. The cost of the wrong move (a scratched platter, a snapped head, a fried PCB) is the data itself.
Is Your Data Still There?
In most cases, yes. The data lives on the platters inside the drive. The platters don't care if the bridge died, the cable failed, or the PCB shorted. They keep their magnetic state until something physically touches them.
The data is at risk in two specific situations:
- You can hear it clicking or grinding. That sound means the read/write heads are crashing into the platters. Every additional power-on cycle adds more scratches. The data on scratched areas is permanently destroyed. If you hear unusual noise, unplug the drive immediately. More on clicking drives here.
- Someone already attempted DIY recovery. Software tools that try to "repair" a drive often write to the platters in ways that overwrite the original data. Chkdsk on Windows, Disk Utility's First Aid on macOS, and almost any tool with the word "repair" in its name can make a recoverable drive unrecoverable.
What NOT to Do
The wrong moves on a Seagate external can turn a $1,000 recovery into an unrecoverable case. Read this list before you touch anything.
- Run "Initialize Disk" in Windows Disk Management. This writes a new partition table over the drive, often destroying the original data layout.
- Click "Format" or "Erase" in macOS Disk Utility. Same problem. You're rewriting metadata that recovery tools need.
- Run chkdsk on a clicking or sluggish drive. Chkdsk writes to the disk to "fix" errors. On a failing drive, this stress can finish off the heads.
- Open the drive yourself. Head and platter work requires a clean, filtered work area. Particles invisible to your eye scratch the surfaces and destroy data.
- Try to swap the PCB with a "matching" board from eBay. Modern Seagate drives store calibration data on the PCB. Swapping with a non-matched board will brick the drive or corrupt data on first power-up.
- Keep plugging it in over and over. Each retry burns through the limited number of head-load cycles a failing drive has left.
- Use "data recovery software" if you hear noise. These tools assume the drive can be read. A clicking drive cannot, and the tool's repeated read attempts add scratches.
Safe Things to Try Before You Call Anyone
These won't make things worse. None of them write to the drive. Run through them in order.
This checks for a cable-related detection problem. The Seagate-branded cables fail more than people realize. Borrow a known-good micro-USB or USB-C cable (depending on your model) and try again. The cable from a different Seagate or WD drive often works fine.
USB ports drift in voltage over time. A port that can't supply enough power for the drive will fail to enumerate it. Try a back-panel USB port on a desktop, or a different port on a laptop. Skip USB hubs and dongles for this test.
If you have access to a second computer (a friend's machine, a work laptop), try the drive there. A driver issue or a USB controller issue on your main machine can make a healthy drive look dead. Five minutes of testing rules out the computer as the cause.
Hold the drive against your ear in a quiet room. You should hear a quiet spin-up whir for about three seconds, then near-silence with occasional faint head movements. If you hear clicking, ticking, beeping, grinding, or repeated spin-up attempts, unplug immediately and call a lab. Repeated power-on of a failing drive causes more damage.
On Windows, right-click Start, open Device Manager, expand "Disk drives" and "Universal Serial Bus controllers". Look for the Seagate drive or a yellow exclamation mark. On Mac, hold Option and click the Apple menu, choose System Information, then USB. Look for the drive's name. If it appears here but not in Finder, the drive is talking but the filesystem is unreadable. If it doesn't appear at all, it's a deeper hardware or cable issue.
If none of these five steps make the drive appear normally, you're looking at a hardware fault that needs lab work. Don't run recovery software. Don't try to format. Don't initialize. The next call should be to a recovery lab.
How to Tell If the Bridge or the Drive Failed
This is the question every Backup Plus owner wants answered. The honest truth: you can't tell for sure from outside the drive. The symptoms overlap heavily. But there are clues that tilt the odds one way or the other.
| Symptom | Most Likely Cause | What That Means for Recovery |
|---|---|---|
| No spin-up at all, drive is silent | Dead PCB or dead bridge | PCB-level work, drive inside likely fine |
| Drive spins, no detection | Bridge chip failure | Bridge bypass via test pads, drive likely fine |
| Drive spins, computer sees "Unknown USB Device" | Bridge partial failure | Bridge bypass, drive likely fine |
| Drive spins, briefly appears, disappears | Bridge intermittent or drive sector errors | Imaging in a lab with a hardware imager |
| Clicking, beeping, or grinding | Mechanical drive failure (heads or motor) | Laminar-flow work area, head replacement |
| Drive appears as "0 bytes" or "Uninitialized" | Firmware corruption or filesystem damage | Vendor tool work or filesystem rebuild |
| Burnt smell from the drive | PCB component failure (often the TVS diode) | PCB component-level repair |
If you have to bet, bet on the bridge or cable. On a Backup Plus less than 5 years old, those two account for more cases than the drive itself failing. On older drives, the odds shift toward mechanical failure. A 2014 Backup Plus that's been used daily for a decade probably has tired heads.
Seagate Rescue Data Recovery (Free for Warranted Drives)
Some Backup Plus models ship with Seagate Rescue data recovery included in the warranty. This is a service Seagate provides in partnership with a third-party recovery lab. If your drive is still within the Rescue warranty period (usually 2 to 3 years from purchase), Seagate will recover the data at no charge. Honest answer: this is a real option you should know about.
The trade-offs to know about:
- Turnaround: Rescue cases typically take 2 to 6 weeks. The standard recovery estimate at MDrepairs is 4–6 weeks; timing may vary by case.
- Privacy: Your data is going to a third-party Seagate vendor. If the data is sensitive (tax records, medical files, business records), some clients prefer a private lab with a direct contract relationship.
- Re-attempts: If Rescue says no, you can still try a private lab afterward. The data isn't damaged by the Rescue process. Just lost time.
For non-urgent personal data on a drive that's still under Rescue warranty, try Seagate first. For business data, anything time-sensitive, or a drive that's out of warranty, a private lab is usually the better call.
Inside the Lab: How We Recover Seagate Backup Plus Drives
When a Backup Plus comes into MDrepairs, the workflow looks roughly like this. The exact steps depend on the failure mode and the drive's age.
Step 1: Non-Destructive Diagnosis
We start by looking at the drive without powering it on through the normal USB path. A current-limited bench power supply lets us see exactly how much current the drive draws at each phase of startup. Healthy spin-up is a specific pattern: a brief inrush, a steady draw for two to three seconds, then a low idle current. Deviations from this pattern point us at the failure. Overcurrent means a short on the PCB. Low current means the spindle isn't spinning. No current means a dead voltage regulator.
Step 2: Bridge Bypass (if needed)
If the bridge has failed, we expose the PCB's SATA test points. These pads vary by drive generation and aren't documented publicly. We have reference photos for every Backup Plus PCB we've seen, so identification is usually fast. Fine wires get soldered to TX+, TX-, RX+, RX-, and ground. Those connect to a hardware imager that talks raw SATA, bypassing the dead bridge entirely.
Step 3: Drive PCB Diagnosis (if the bridge tested fine)
If the bridge is alive but the drive isn't responding, we look at the drive's own PCB. Common failures here: a blown TVS diode (a small protection component on the 12V or 5V rail), a fried voltage regulator, or a corrupted firmware ROM on the PCB. Firmware ROM swaps take longer because we have to match the ROM contents from the original PCB to a donor PCB.
Step 4: Drive Mechanical Diagnosis (if PCB tested fine)
If the PCB is healthy but the drive still doesn't respond, we move to mechanical assessment. Head and platter work takes place in a laminar-flow work area. We open the cover and inspect the platters under a microscope. If the heads are stuck against the platters (a "stuck head" failure), they get unparked carefully. If the heads have crashed and scored the platters, we assess how deep the damage is. If the spindle motor is failing, we may need to do a full platter swap into a donor drive.
Step 5: Imaging (the actual data copy)
Whatever the failure was, the recovery itself is an image of the drive made one sector at a time onto a known-good destination drive. Hardware imagers can read at different speeds and skip over bad sectors automatically. Bad sectors get marked and reread later with different parameters. The output is a complete bit-for-bit copy of every readable area.
Step 6: Filesystem Rebuild and File Extraction
From the image, we rebuild the filesystem (NTFS on most Backup Plus drives, exFAT or HFS+ on some) and pull your files. If the partition table or filesystem itself is damaged, we use raw-recovery techniques that scan the image for file signatures and rebuild structures from the data alone.
How Much Does Seagate Backup Plus Recovery Cost?
Cost depends on the failure mode. The complexity of bridge-bypass work is roughly mid-tier in our pricing. Mechanical work is the high end.
| Failure Type | Typical Range | Why |
|---|---|---|
| Bad cable (free fix at home) | $0 | Try a new cable, don't ship the drive |
| Filesystem-only damage, drive healthy | $1,000 to $1,500 | Software-side imaging and filesystem rebuild |
| Bridge chip failure, bypass via test pads | $1,000 to $1,500 | Soldering work plus imaging time |
| Drive PCB component repair | $1,000 to $1,500 | Component-level diagnostic and replacement |
| Firmware corruption | $1,000 to $1,500 | Vendor-tool work, deep firmware knowledge |
| Mechanical failure (heads, motor) | $1,500 to $3,000+ | Laminar-flow work area, donor parts, matched components |
| Severe head crash with platter damage | Case-by-case, sometimes unrecoverable | Depends on scratch depth and location |
At MDrepairs, we diagnose. The $100 diagnostic is credited toward a successful recovery. The $100 diagnostic is non-refundable once diagnostics start, and donor drives or replacement parts you approve are non-refundable once ordered, even if recovery fails. You approve the estimate before recovery work starts. Our full data recovery pricing page has more detail across all device types.
Backup Plus Models We Recover
The Backup Plus line has shipped in a lot of variants since 2013. We recover all of them. Recovery technique varies by which generation and what's inside.
| Model | Typical Capacity | Recovery Notes |
|---|---|---|
| Backup Plus Slim (current) | 1TB, 2TB, 4TB, 5TB | Integrated bridge, 2.5-inch drive inside |
| Backup Plus Portable | 4TB, 5TB | Often 15mm thick, 2-platter 2.5-inch drives |
| Backup Plus Ultra Slim | 1TB, 2TB | Thinnest line, fragile if dropped |
| Backup Plus Hub | 4TB, 6TB, 8TB | Desktop unit with 3.5-inch drive, separate power adapter |
| Backup Plus Desktop | 3TB, 4TB, 5TB | 3.5-inch enclosure, integrated bridge |
| Backup Plus Fast (RAID 0) | 4TB | Two 2.5-inch drives in RAID 0, both must be recovered |
| Backup Plus Mac (HFS+ formatted) | 1TB through 5TB | Identical hardware to Windows model, different format |
| Backup Plus 2.5-inch (pre-Slim) | 500GB, 1TB, 2TB | Earlier generation, sometimes uses SMR platters |
If you don't know which model you have, check the bottom of the drive. The "ST" model number tells us exactly which generation and which drive is inside.
How to Stop This From Happening Again
A Backup Plus is fine as a backup if it's not your only copy. The mistake people make is treating it as the master copy of important data. External drives fail. All of them. The question is when, not if.
Follow the 3-2-1 Rule
Three copies of your data, on two different types of media, with one copy offsite. So: your computer, an external drive, and a cloud backup like Backblaze or iDrive. If any one of those three dies, you still have two copies. More on protecting devices that might be on their last legs.
Replace the Cable Every Few Years
Cables fail more than drives. Buy a quality USB cable rated for your drive's connection type. If your drive has a removable USB cable, treat it as a consumable.
Eject Before Unplugging
Yanking a drive out without ejecting can corrupt the filesystem during a write. Modern operating systems usually handle this gracefully, but not always. Click eject and wait for the "safe to remove" message every time.
Keep It Cool and Dry
Don't leave the drive on a sunny windowsill, in a hot car, or under a stack of papers blocking ventilation. Heat is the enemy of every hard drive ever made.
Test Your Backups Quarterly
A backup you never restored from isn't a backup. Once a quarter, copy a folder back from the Backup Plus to your computer to verify the drive actually reads. This catches failing drives months before the failure becomes total.
Run S.M.A.R.T. Checks
The drive inside your Backup Plus reports health data via S.M.A.R.T. (Self-Monitoring, Analysis, and Reporting Technology). Tools like CrystalDiskInfo (Windows) or DriveDx (Mac) can read this data through the USB bridge on most Backup Plus models. Yellow or red warnings mean the drive is dying. Replace before failure, not after. How to use CrystalDiskInfo properly.
FAQ
Why does Seagate use an integrated bridge instead of a removable enclosure?
Two reasons. Cost (one PCB is cheaper than two) and size (a slim drive enclosure can't fit two boards). The trade-off is that recovery is harder when the bridge fails. Other brands like WD have done the same thing on some models for similar reasons.
Can I just pop the drive out of my Backup Plus Slim and read it with a SATA cable?
No. The drive inside Backup Plus Slim doesn't have a standard SATA connector. The connector on the PCB is non-standard and wires directly to the integrated bridge. You can't just attach SATA cables. This is why the bridge-bypass approach in a lab is needed.
I dropped my Backup Plus last week and now it's clicking. What do I do?
Unplug it immediately. Don't power it back on. Every additional spin-up with damaged heads adds scratches to the platters and reduces the chance of full recovery. Clicking drives are time-sensitive. More on clicking drives here.
Does Seagate Rescue actually work?
Yes, often. Seagate Rescue uses a real lab partner that recovers most cases. Its turnaround is 2 to 6 weeks, and they're sometimes constrained by the volume they process. For warranted drives with non-urgent personal data, it's worth trying. For business data or time-sensitive cases, discuss the timing with the lab before choosing a service.
My Backup Plus appears in Disk Management as "Disk 1 Unknown Not Initialized." Should I click Initialize?
No. Initialize writes a new partition table. The original partition table is what tells your computer where your files start and end. If you initialize, that map is overwritten. The files are still on the drive but the OS can no longer find them. We have a full breakdown of this exact problem here.
What about other Seagate externals like the Expansion and One Touch?
Same principle, different enclosures. The Expansion is functionally similar to Backup Plus and has the same integrated-bridge issue. The One Touch line uses similar designs. We recover all of them. Our Seagate Expansion beeping guide covers a related issue.
Can I swap the PCB with one from an identical Seagate drive I bought on eBay?
No, not safely. Modern Seagate drives store unique calibration data (called "adaptive" or "ROM" data) on the PCB. If you swap the board without transferring the ROM data, the drive will either fail to spin up or, worse, corrupt the data on its first read attempt. The PCB swap is a lab-only operation.
How long does Seagate Backup Plus recovery take at MDrepairs?
Our standard recovery estimate is 4–6 weeks; timing may vary by case. The queue, donor parts, device condition, imaging and delivery affect the schedule. Rush service moves the diagnostic start ahead in the queue only and does not set a recovery completion date. Confirm availability with the lab. More on typical recovery timelines.
Do you ship to people outside New Jersey?
Yes. We accept external drive cases by mail from across the country. You generate a free prepaid UPS label on the mail-in form (contiguous US), with signed-for delivery. How to ship a hard drive safely walks through the process.
What if my data isn't worth the cost of recovery?
That's an honest question and we'll give you an honest answer. The phone consult is always free. If you call us before sending the drive, we'll explain typical pricing for your specific failure mode based on the symptoms you describe. If your data isn't worth the price, we'll tell you up front so you can decide. Our piece on whether data recovery is worth it covers this decision in depth.
MDrepairs is an independent data recovery lab serving customers nationwide via mail-in service. We're not affiliated with Seagate. Our specialty is getting data off devices that have failed, when that's the only thing you actually care about.
Get help with data recovery
Bring your device to our Lincroft lab during opening hours, or mail it in.
How to mail your deviceThe $100 diagnostic is non-refundable once diagnostics start, and donor drives or replacement parts you approve are non-refundable once ordered, even if recovery fails.
Published by MDrepairs
MDrepairs is a data recovery and electronics repair lab in Lincroft, New Jersey. Our founder and lead technician Joseph Montanti films real cases for our YouTube channel, showing tools, repair steps and recovery outcomes.
Keep reading
- BitLocker Recovery Key Not Working? Check the Key ID Before Resetting
- exFAT Drive Corrupted? Cross-Platform Rescue Guide
- External Drive Painfully Slow? It May Be Dying